終於要把現實世界和數位世界連接了,一開始的現實對象是環境溫、濕度,所以要使用溫、濕度監測器或是說監測模組。
模組一般都是將主功能電子零件加上必要的配套電路成為獨立零件,非電子專業使用會比較方便,Hoyo 使用的模組是 DHT-11
(非業配,賣場內還有另一個是只有監測器,比較便宜可是沒有應用電路)
--
加入程式庫
為了讀取 DHT11 數據,所以直接用其他大大分享的程式庫是比較快速的方式
- DHT11 Sensor für Temperatur und Luftfeuchtigkeit am Arduino
- dht11 (Hoyo 用這個)
- 数字温湿度传感器DHT11 (中文 Datasheet)
從 GitHub 下載 zip 打開 Arduino IDE,草稿檔 → 匯入程式庫 → dht11-master.zip
--
程式範例 - 從串列埠觀看溫、濕度
|
1 2 3 4 5 6 7 8 9 10 11 12 13 14 15 16 17 18 |
#include <dht11.h> dht11 DHT11; #define DHT11PIN 12 void setup(){ Serial.begin(115200); Serial.print( "Start..." ); } void loop(){ int chk = DHT11.read(DHT11PIN); Serial.print( (float)DHT11.temperature, 2 ); Serial.print(" : "); Serial.println( (float)DHT11.humidity, 2 ); delay(2000); } |
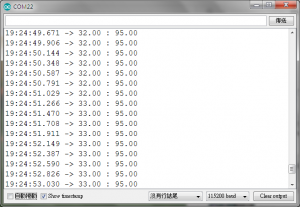
下圖中的 delay 時間為 200 ,並非上面設定的 2000

--
將 DHT11 讀取溫、濕度上傳到主機
先假設你已經有一個可以使用 HTTP API 上傳資料的主機,然後接下來就是如何把資料丟上去,在此假設的規格是使用 GET 傳遞
|
1 2 3 4 5 6 7 8 9 10 11 12 13 14 15 16 17 18 19 20 21 22 23 24 25 26 27 28 29 30 31 32 33 34 35 36 37 38 39 40 41 42 43 44 45 46 47 48 49 50 51 52 53 |
#include <dht11.h> #include <ESP8266WiFi.h> // const char* ssid = "ssid name"; const char* password = "ssid password"; dht11 DHT11; #define DHT11PIN 12 float t; float h; WiFiClient client; String serverURL = "iot.hoyo.idv.tw"; String url = ""; void setup() { Serial.begin(115200); Serial.print( "Start..." ); WiFi.mode(WIFI_STA); WiFi.begin(ssid, password); while (WiFi.status() != WL_CONNECTED) { delay(500); Serial.println("."); } } void loop() { int chk = DHT11.read(DHT11PIN); t = DHT11.temperature; h = DHT11.humidity; delay(1000); Serial.print( (float)DHT11.temperature ); Serial.print(" : "); Serial.println( (float)DHT11.humidity ); url = "/iot.php?t=" + String(t) + "&h=" + String(h); if (client.connect(serverURL, 80)) { client.println("GET " + url + " HTTP/1.1"); client.println("Host: " + serverURL); client.println("Connection: close"); client.println(); client.stop(); } delay(2000); } |
--
上傳到其他 IoT 平台 - 以 Ubidots 為例
- 安裝 ubidots/ubidots-esp8266: Library for uploading ESP8266 devices to Ubidots
- 程式範例 SendValuesHttp.ino
|
1 2 3 4 5 6 7 8 9 10 11 12 13 14 15 16 17 18 19 20 21 22 23 24 25 26 27 28 29 30 31 32 33 34 |
#include "Ubidots.h" #include <dht11.h> const char* UBIDOTS_TOKEN = "BBFF-abFB2KelTXxxxxxxxxxHo5eORjEy"; const char* ssid = "wifi name"; const char* password = "wifi password"; dht11 DHT11; #define DHT11PIN 12 Ubidots ubidots(UBIDOTS_TOKEN, UBI_HTTP); void setup() { Serial.begin(115200); ubidots.wifiConnect(ssid, password); } void loop() { int chk = DHT11.read(DHT11PIN); Serial.print( (float)DHT11.temperature, 2 ); Serial.print(" : "); Serial.println( (float)DHT11.humidity, 2 ); float t = DHT11.temperature; float h = DHT11.humidity; ubidots.add("Temperature", t); ubidots.add("Humidity", h); bool bufferSent = false; bufferSent = ubidots.send(); delay(5000); } |
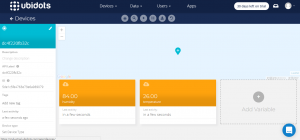
從 Devices 查看上傳數據
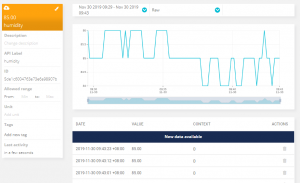
點選單一監測數據可以看到詳細數據
--
接腳接反會燒壞!
其實電子零件大多是這樣的下場,以前搞音響 DIY 燒的更慘 ...
--
優、缺點
極限值以及準確度是 DHT11 的硬傷,所以在熟悉 DHT11 之後可以選擇更高階的同類產品,例如 DHT2x 系列
--
12,076 total views, 2 views today


你好,請問我上傳後出現下面訊息,請教那邊出了問題?謝謝。
Arduino:1.8.13 (Windows 10), 開發板:"Generic ESP8266 Module, 80 MHz, Flash, Legacy (new can return nullptr), All SSL ciphers (most compatible), dtr (aka nodemcu), 26 MHz, 40MHz, DOUT (compatible), 1MB (FS:64KB OTA:~470KB), 2, nonos-sdk 2.2.1+100 (190703), v2 Lower Memory, Disabled, None, Only Sketch, 115200"
DHT11_V2:2:19: fatal error: dht11.h: No such file or directory
#include
^
compilation terminated.
exit status 1
dht11.h: No such file or directory
This report would have more information with
"Show verbose output during compilation"
option enabled in File -> Preferences.
文章一開始有一個段落是 「加入程式庫」 裡面就有 DHT11 的 GitHub 連結,下載 zip 後還需要匯入程式庫才行